Workspace Management
Invites
Invites are how you add named members to a workspace — with a specific role — before they can join. Each invite controls whether someone can operate the admin console or only use your application.
What is an invite?
An invite is a single-use key tied to your workspace and a chosen role (Admin or User). When you create one in Workspace Manager, secureFlows generates a secret key and a shareable activation link — you send that link (or key) to the person who should join.
The recipient still creates a Google account (or uses an existing one) via Firebase — the invite does not skip authentication. It proves they were expected to join and assigns their role when they sign up through the activation flow.
Admins are invite-only
The workspace Owner is created when you first set up the workspace. After that, Admin is the only role you can grant through an invite — there is no self-signup path to become an admin operator.
If someone should manage applications, billing, analytics, or security in Workspace Manager, create an invite with role Admin and share the activation link. Once they activate, they can access the console the same way you do.
Invited members vs open signup
secureFlows distinguishes two ways people end up in a workspace:
- Invited members (non-anonymous) — accepted an invite and received role User or Admin. They are known, provisioned users with a fixed role.
- Open signup — when Accept anonymous users is on (the default), new visitors can sign up through hosted login without an invite and get their own isolated space automatically.
When Accept anonymous users is off, open signup stops — every person who should use the workspace (including app end users) needs a User invite first. Admins still always need an invite regardless of that setting.
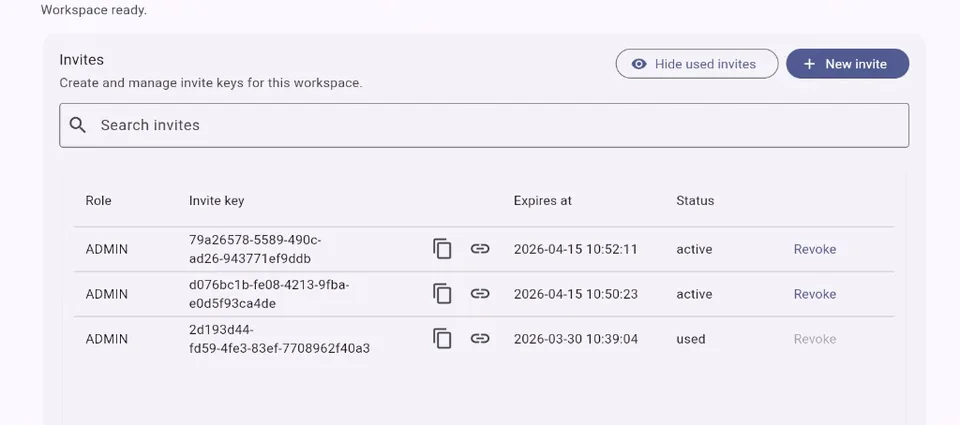
Invite lifecycle
- Create — in Invites, click + New invite, choose Admin or User, and set a time-to-live. Status is active.
- Share — copy the invite key or link icon URL and send it to the recipient (email, chat, ticket — secureFlows does not email it for you).
-
Sign up — recipient opens the link (
/app/accept-invite?key=…) and creates or selects their Google account via Firebase. -
Activate — recipient clicks Activate account. secureFlows creates their
user row with the invite role and marks the invite used (single-use).
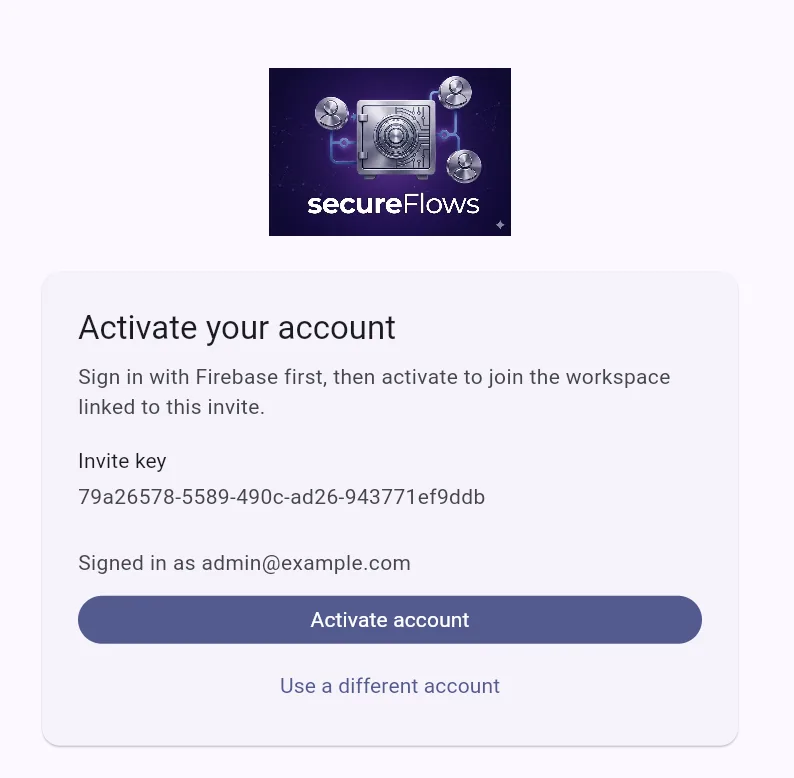
Activate your account — confirm the invite key, then click Activate account. - Revoke or expire — while still active, you can Revoke an invite so the link stops working. Unused invites also expire automatically at the time you set at creation.
Roles at invite time
- Admin — can use Workspace Manager (applications, users, analytics, security).
- User — uses your app and the self-service portal; not the admin console.